Connecting to a Linux VM via SSH
The recommended method for connecting to a VM over SSH uses a key pair: the public key resides on the VM, and the private one is kept by the user. To enable another user to connect to your VM, add an SSH key for them by following this guide. Connecting with a key pair is more secure than with a username and password.
Note
For a VM with OS Login access enabled, we recommend specifying SSH keys when creating a VM: this way, you can connect to a VM over SSH even if you disable OS Login access for it.
Creating an SSH key pair
-
Open the terminal.
-
Use the
ssh-keygencommand to create a new key:ssh-keygen -t ed25519After you run the command, you will be asked to specify the names of files where the keys will be saved and enter the password for the private key. Press Enter to use the default name and path suggested by the command.
The key pair will be created in the current directory. The public key will be saved in a
.pubfile.
If you do not have OpenSSH installed yet, install it by following this guide.
-
Run
cmd.exeorpowershell.exe(make sure to update PowerShell first). -
Use the
ssh-keygencommand to create a new key. Run this command:ssh-keygen -t ed25519After you run the command, you will be asked to specify the names of files where the keys will be saved and enter the password for the private key. Press Enter to use the default name and path suggested by the command.
The key pair will be created in the current directory. The public key will be saved in a
.pubfile.
Create keys using the PuTTY app:
-
Download and install PuTTY.
-
Make sure that the directory where you installed PuTTY is included in
PATH:- Right-click My computer. Click Properties.
- In the window that opens, select Additional system parameters, then Environment variables (located in the lower part of the window).
- Under System variables, find
PATHand click Edit. - In the Variable value field, append the path to the directory where you installed PuTTY.
-
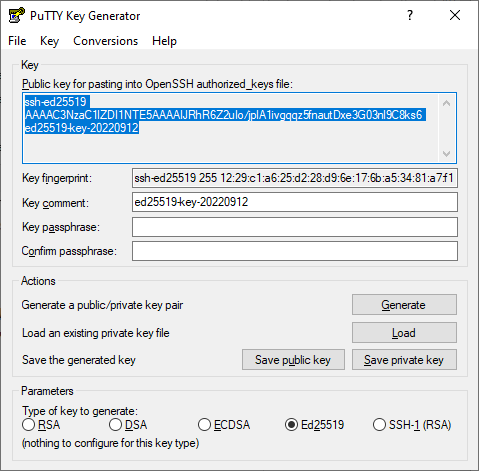
Launch the PuTTYgen app.
-
Select EdDSA as the pair type to generate. Click Generate and move the cursor in the field above it until key creation is complete.
-
In Key passphrase, enter a strong password. Enter it again in the field below.
-
Click Save private key and save the private key. Do not share its key phrase with anyone.
-
Save the key to a text file. To do this, copy the single-line public key from the text field to a text file named
id_ed25519.pub.
Warning
Save the private key in a secure location, as you will not be able to connect to the VM without it.
Copying a public key to the clipboard
Copy the key from the <key_name>.pub file using any text editor, such as Notepad. Please note that the key must be written as a single line (no returns or line breaks).
You can also copy the key using the command line:
-
Run the terminal.
-
Output the file contents:
cat ~/.ssh/<key_name>.pubWhere
<key_name>is the key name, such asid_ed25519orid_rsa.The public key will be shown on the screen. Select and copy its text to the clipboard. For example:
ssh-ed25519 AAAAC3NzaC1lZDI1NTE5ABFLIFyapYheN7OZNhTaNqEHefjmU5mtzK********+gRPCz user@Desktop. -
You can copy the file contents right to the clipboard:
For Linux:
cat ~/.ssh/id_ed25519.pub | xclip -selection clipboardFor macOS:
cat ~/.ssh/id_ed25519.pub | pbcopyPaste the public key into the SSH key field when creating a new VM in the management console.
-
Run
cmd.exeorpowershell.exe. -
Output the file contents:
type C:\Users\<username>\.ssh\<key_name>.pubWhere:
<username>: Your Windows account name, such asUser.<key_name>: Key name, such asid_ed25519orid_rsa.
The command will output the public key. To copy the key, select and right-click it. For example:
ssh-ed25519 AAAAC3NzaC1lZDI1NTE5ABFLIFyapYheN7OZNhTaNqEHefjmU5mtzK********+gRPCz. -
You can copy the file contents right to the clipboard:
type C:\Users\User\.ssh\id_ed25519.pub | clipPaste the public key into the SSH key field when creating a new VM in the management console.
Connecting to a VM
Note
SSH connections using a login and password are disabled by default on public Linux images that are provided by Yandex Cloud.
You can connect to a VM with the RUNNING status over SSH. Some time may be required to initialize all the services after the VM starts. If there is a connection error, retry after a few minutes.
To connect, you can use the ssh utility on Linux/macOS/Windows 10 and PuTTY on Windows 7/8.
VM security groups must allow incoming TCP traffic to port 22.
To connect, specify the VM's public IP address. You can find out the public IP address in the management console. On the VM's page, go to the Network section and find the Public IPv4 field. If you created a VM with an internal IP address only, bind it to a public IP address.
You can also use the internal IP addresses and FQDNs to establish an SSH connection between the VMs on a single cloud network in Yandex Cloud.
In the terminal, run this command:
ssh <username>@<VM_public_IP_address>
Where <username> is the VM account username.
If you have multiple private keys, specify the one you need:
ssh -i <key_path/key_file_name><username>@<VM_public_IP_address>
If this is the first time you connect to a VM, you will see a warning about an unknown host:
The authenticity of host '130.193.40.101 (130.193.40.101)' cannot be established.
ECDSA key fingerprint is SHA256:PoaSwqxRc8g6iOXtiH7ayGHpSN0MXwUfWHk********.
Are you sure you want to continue connecting (yes/no)?
Type yes in the terminal and press Enter.
Make sure that the Windows account has read privileges on the folder containing the keys.
To connect to the VM, execute the following command in the command line:
ssh <username>@<VM_public_IP_address>
Where <username> is the VM account username.
If you have multiple private keys, specify the one you need:
ssh -i <key_path\key_file_name> <username>@<VM_public_IP_address>
If this is the first time you connect to a VM, you will see a warning about an unknown host:
The authenticity of host '130.193.40.101 (130.193.40.101)' cannot be established.
ECDSA key fingerprint is SHA256:PoaSwqxRc8g6iOXtiH7ayGHpSN0MXwUfWHk********.
Are you sure you want to continue connecting (yes/no)?
Type yes in the command prompt and press Enter.
Establish a connection using the PuTTY app:
- Run the Pageant application.
- Right-click on the Pageant icon in the task bar.
- In the context menu, select Add key.
- Select a PuTTY-generated private key in the
.ppkformat. If a password is set for the key, enter it.
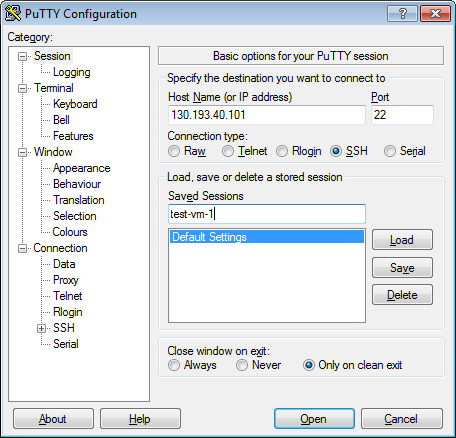
- Run PuTTY.
-
In the Host Name (or IP address) field, enter the public IP address of the VM you want to connect to. Specify port
22and SSH as the connection type.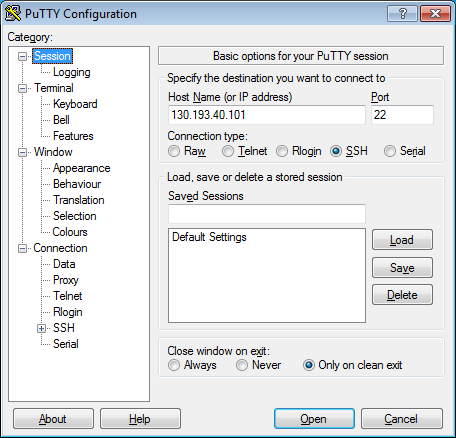
-
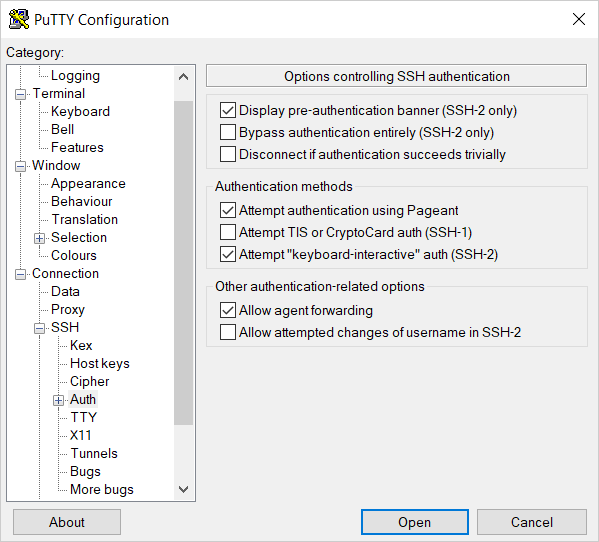
In the tree on the left, select Connection → SSH → Auth.
-
Set the Allow agent forwarding option.
-
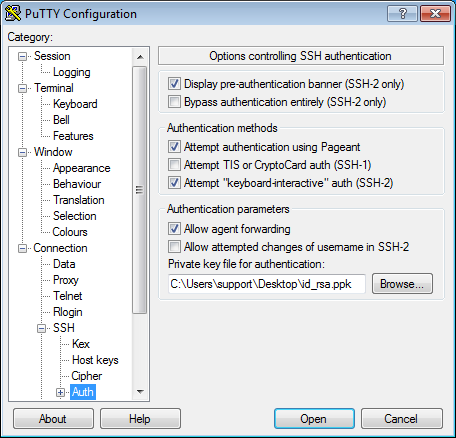
In the tree on the left, select Connection → SSH → Auth → Credentials.
-
In the Private key file for authentication field, select the file with the private key.
-
Go back to the Sessions menu. In the Saved sessions field, enter any session name and click Save. The session settings are saved under the specified name. You can use this session profile to connect using Pageant.
-
Click Open. If this is the first time you connect to a VM, you might see a warning about an unknown host:
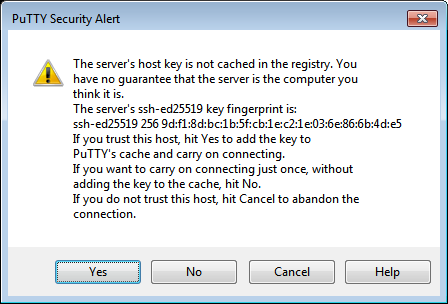
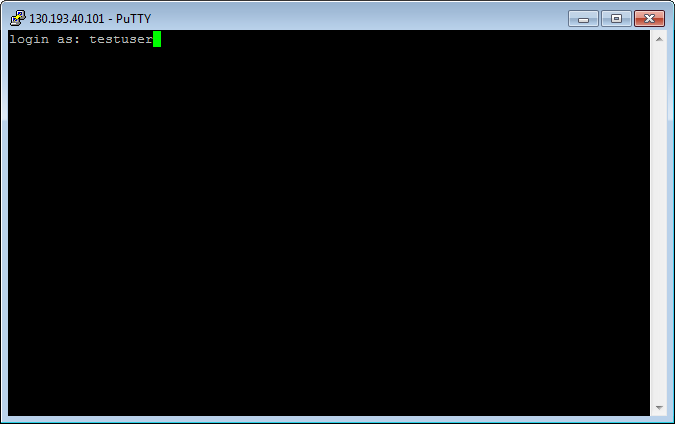
Click Accept. A terminal window opens suggesting that you enter the login of the user on whose behalf the connection is being established. Type the username that you specified when creating the VM and press Enter. If everything is configured correctly, the connection with the server will be established.
-
If you saved the session profile in PuTTY, you can use Pageant to establish a connection in the future:
- Right-click on the Pageant icon in the task bar.
- Select the Saved sessions menu item.
- In the saved sessions list, select the necessary session.
For more information on how to solve connection issues, see FAQ.
Adding SSH keys for other users
You can add SSH keys for another VM user. To do this, create a new user and add a file with the authorized keys for this user.
To create multiple users with keys at the same time, use metadata.
To configure users from within the VM, follow these steps:
-
Connect to the VM under the username you specified when creating the VM in the management console. If you created the VM via the CLI,
yc-useris used by default.Note
To get information about a VM with user metadata, run the command:
yc compute instance get --full <VM_name> -
Create a new user and specify a default
bashwrapper for this user:sudo useradd -m -d /home/testuser -s /bin/bash testuser -
Switch to the new user:
sudo su - testuser -
Create the
.sshfolder in the new user's home directory:mkdir .ssh -
In the
.sshfolder, create theauthorized_keysfile:touch .ssh/authorized_keys -
Add the new user's public key to the
authorized_keysfile:echo "<public_key>" >> /home/testuser/.ssh/authorized_keys -
Change the access permissions to the
authorized_keysfile and the.sshfolder:chmod 700 ~/.ssh chmod 600 ~/.ssh/authorized_keys -
Disconnect from the VM using the
exitcommand. -
Restart the VM.
-
Check the connection for the new user:
ssh testuser@<VM_public_IP_address>