Customizing the appearance of a form
Customize the theme
To make your form unique and appealing, customize the appearance of the text and buttons or add a background image:
-
Select the form and open the Theme tab.
-
Pick one of the available themes or create your own using the Create theme button:
-
Set a background for the form workspace: choose a fill color or an image from the gallery, or upload your own background. You can set background transparency, corner rounding, and text indentation. To make the background visible behind the response fields, set field transparency.
-
Select the fonts and text color. Try to choose a color that makes the text easy to read against your selected background.
-
Adjust the color, shape, and position of the buttons.
-
Select the backdrop: the background around the form workspace. To do so, turn on Add backdrop, select a fill color, pick an image from the gallery, or upload your own background. The backdrop is visible if you open the form via a link.
-
Click Save. To change you theme, hover over the trigger and click
 .
.
-
-
Click Save at the bottom of the page.
If the form is already published, its design changes.
Button names and messages
You can set form button names and the message that the user sees after submitting their response:
-
Select a form and go to Settings → Text and submit logic.
-
Change the button names under Form submission button, Next page button, or Previous page button.
-
Edit the title and text of your message under Event after submit.
-
Click Save.
Formatting text
To add formatting elements like headers, lists, links, and italics to the text, use Markdown. You can format using Markdown:
-
Prompts and comments.
-
The message about sending the form.
Note
To format text, Markdown uses *, -, >, and some other characters. If these characters are at the beginning of a line, they change the appearance of the text, but aren't displayed. To display them, add a backslash (\*) before these characters.
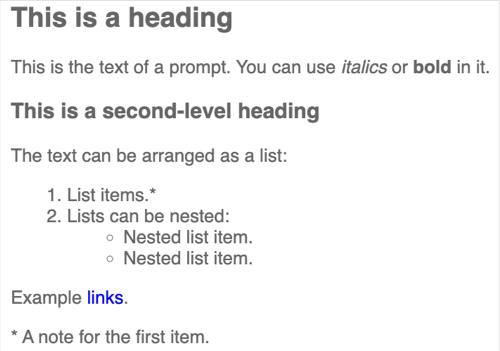
Sample markup
Markup:
## This is a heading

This is the text of a prompt. You can use *italics* or **bold** in it.

### This is a second-level heading

The text can be arranged as a list:
1. List items.*
1. Lists can be nested:
    * Nested list item.
    * Nested list item.

Example [links](https://yandex.ru).

\* A note for the first item.
Result:
Showing previous user responses
You can set up the form to show the user's previous responses so that the user can edit them.
Enable this setting if you want to track changes in user responses: both the old and new versions will be stored. You can see all the responses on the response page.
Warning
Previous responses are only shown to the user if they fill out the form using the same Yandex account.
To show user responses on the form page:
-
Select the form and open the Settings → Additional tab.
-
Under Advanced, enable the option Show previous user responses in the form.
-
Click Save.