Trigger use cases in Tracker
- Picking assignees automatically
- Summoning assignees automatically
- Changing an issue status after creating a link
- Sending a notification when an issue is created from an email
- Sending a notification when an issue is created based on a form
- Automatically adding a form to the issue comments
- Automatically adding issues to your board
- Sending notifications to instant messengers
- Automatically calculating the difference between dates
- Creating a sub-issue and writing field values from its parent issue to it
- Updating status, priority and adding a comment in related issues
Here are some examples of how triggers work in Tracker:
-
How to automatically pick assignees based on their status or component.
-
How to automatically invite the assignee to comment depending on the field status and value.
-
How to automatically change an issue status after adding a certain type of link to it.
-
How to automatically notify a user after an issue was created based on a request sent to the support team via email.
-
How to automatically notify a user after an issue was created based on a request sent to the support team via Yandex Forms.
-
How to automatically add a form to the issue comments.
-
How to set up notifications in messengers via HTTP requests.
-
How to automatically calculate the difference between dates in Tracker.
-
How to create a sub-issue and write field values from its parent issue to it.
Picking assignees automatically
It might often be the case that different employees are assigned to perform specific work stages. When an employee has completed their part of the work, they hand over the issue to the next assignee. In Tracker, each issue stage has its own status. When the issue switches over to a certain status, you can use a trigger to automatically set the assignee for the next work stage.
Another way to organize the workflow is to make certain employees responsible for certain work areas. For example, each support employee is responsible for requests relating to their products. To manage this kind of workflow, you can configure components that correspond to specific products. When a certain component is added to an issue, you can use a trigger to automatically set the assignee responsible for the given product.
Let's set up a trigger to automatically assign the issue:
-
Make sure every employee you might want to assign has full access to Tracker.
-
Go to the queue settings, open the Triggers section, and click Create trigger.
-
Enter a name for the trigger.
-
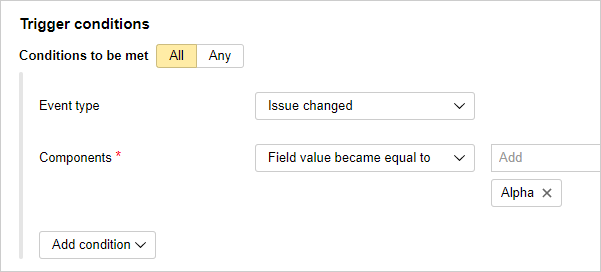
Set the conditions for the trigger to fire when the Status or Components parameters of the issue change:
-
Select Conditions to be met → All.
-
Add the condition: Event → Issue changed.
-
If you want a new assignee to be picked after a status update, add the System → Status → became equal to condition and specify the status. The available statuses depend on the workflow set up for the queue.

If you want a new assignee to be picked after a component changes, add the System → Components → became equal to condition and specify the components.
Note
The trigger with this condition will fire only if a single component is specified in the issue.
-
-
Set the action for the trigger:
-
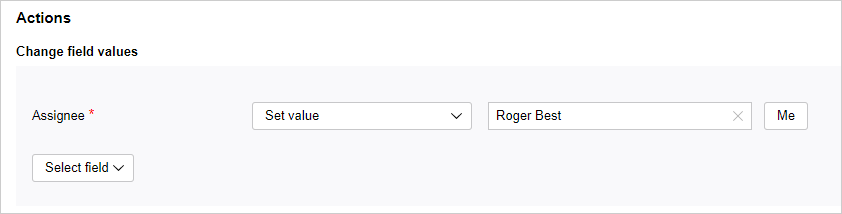
Add the action Update fields.
-
Select System → Assignee → Set value and specify who should be picked as the assignee once the trigger is fired.
-
-
Save your trigger.
To check the trigger operation, change the status or components for any issue from the queue that you set up the trigger for.
Summoning assignees automatically
Having completed the issue, the employee might forget to specify some important information, for example, the time spent. In this case, you can set up a trigger that will automatically summon the user if the issue was closed, but the time spent was not specified.
-
Go to the queue settings, open the Triggers section, and click Create trigger.
-
Enter a name for the trigger.
-
Set the conditions for the trigger to fire on closing the issue in case the Time spent field is empty:
-
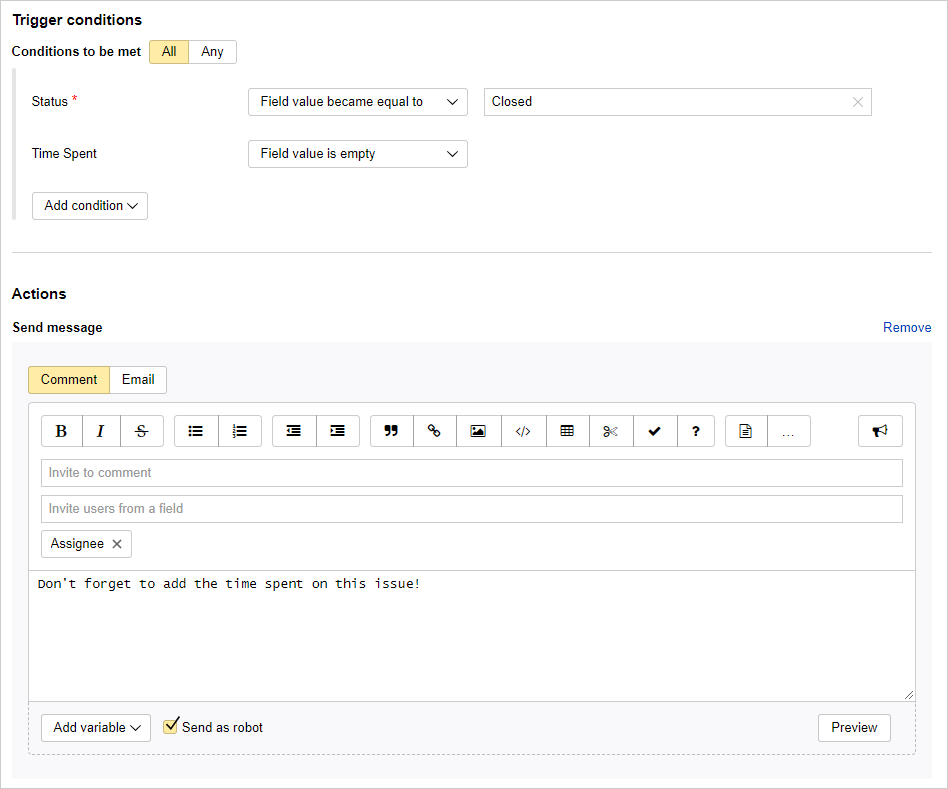
Select Conditions to be met → All.
-
Add the condition: System → Status → became equal to → Closed. The available statuses depend on the workflow set up for the queue.
-
Add the condition: Time spent → Time Spent → Field value is empty.
-
-
Set the actions for the trigger:
-
Add the Add comment action.
-
Click
 and enter Assignee in the Invite users from field line.
 -
Enter the comment to be displayed to the issue assignee and choose Send as robot.
-
-
Click Create to save the trigger.
Whenever an issue is closed without specifying the time spent, the robot will create a comment and summon the assignee.
Changing an issue status after creating a link
In many projects, issues depend on each other even if different people are working on them. If an issue affects the progress of one or more other issues, it is important to notify other team members if any problems arise. For example, you can link such issues to each other and set the Blocks link type
Let's set up a trigger that will change an issue status and add a comment for its reporter when the Blocks link is added:
-
Go to the queue settings, open the Triggers section, and click Create trigger.
-
Enter a name for the trigger.
-
Set the trigger to fire when the Blocks link appears:
-
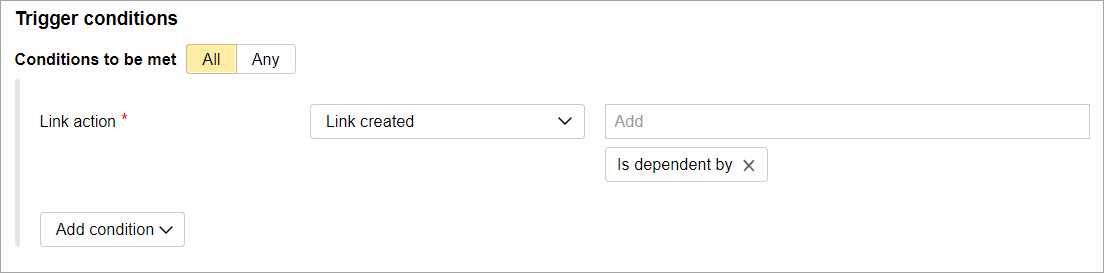
Select Conditions to be met → All.
-
Add the condition: Action with link → Link created → Blocks.
-
-
Set the actions for the trigger:
-
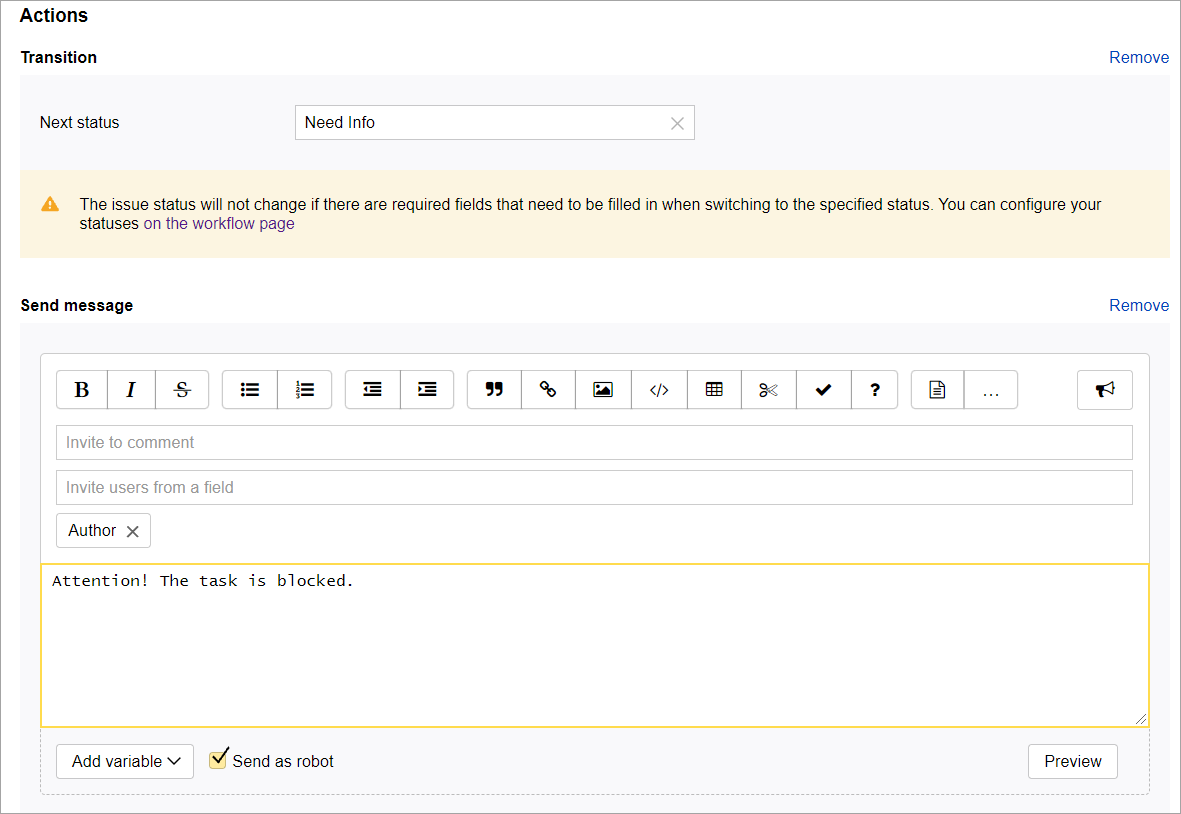
Add the action Change issue status.
-
In the Next status field, select the status to switch the issue to when the condition is met, e.g., Need Info. The available statuses depend on the workflow set up for the queue.
-
Add the Add comment action.
-
Click
and enter Reporter in the Invite users from a field line. -
Enter the comment to be displayed to the issue reporter and choose Send as robot. Otherwise, the comment is sent on behalf of the user who initiates the trigger action by adding the link.
-
-
Click Create to save the trigger.
Sending a notification when an issue is created from an email
Let's say the support team is processing user requests in Tracker. Users contact the support team via email, and those emails are used as the basis for issues in Tracker.
Let's set up a trigger that, once the issue is created, sends to the user an email that their request has been registered.
Step 1. Set up email integration
You need to set up email integration if you want to send emails right from Tracker and create issues from incoming emails:
-
Set up an email address for the queue to store issues created based on user requests.
If you cannot add an address for the queue, it means that your organization does not have a domain. You need a domain to create mailboxes and newsletters, for example, to add an email address for your queue. You can add a domain in Yandex 360 for Business free of charge.
-
Set up sender names and signatures if needed.
-
If the users are not your company employees:
Step 2. Setting up a trigger for sending emails
Set up a trigger that, whenever an issue created based on an email, will notify the user via email:
-
Go to the queue settings, open the Triggers section, and click Create trigger.
-
Enter a name for the trigger.
-
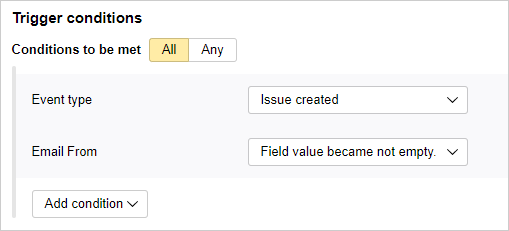
Set up the conditions to fire the trigger when an issue is created based on an incoming email:
-
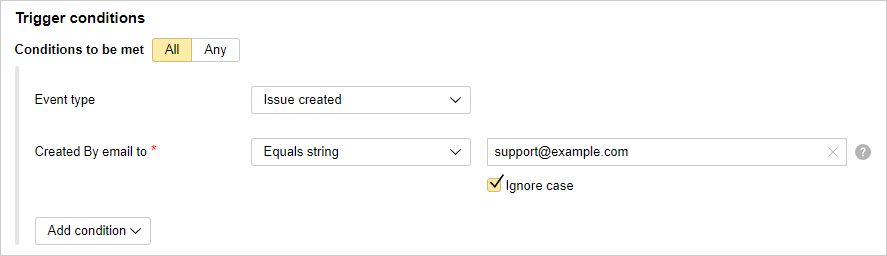
Select Conditions to be met → All.
-
Add the condition: Event → Issue created.
-
Add the Email → Created By email to → Is equal to the line condition and enter the email address to your queue.
-
Enable Ignore case so that the queue address is not case sensitive.
-
-
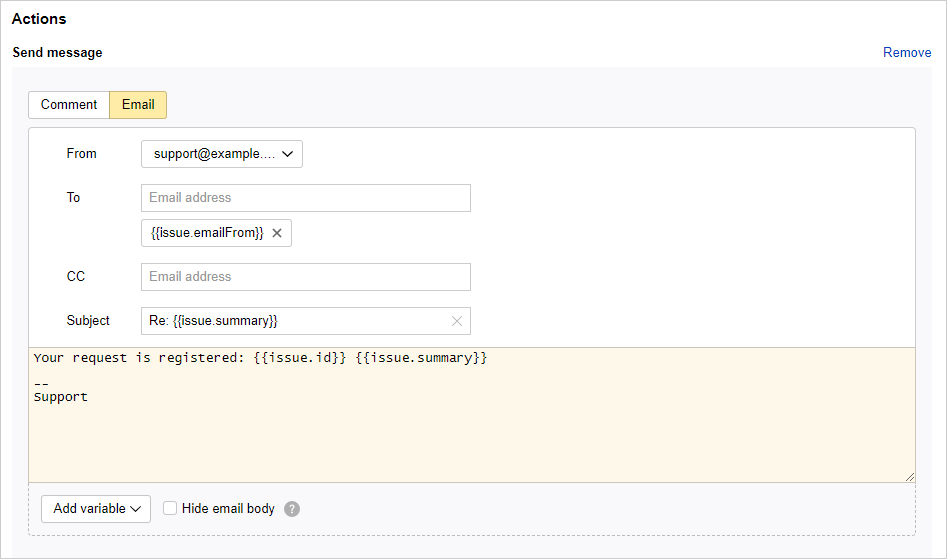
As a trigger action, set up sending an email:
-
Choose the Add comment action.
-
Enable Email.
-
In the Email To field, add the variable with the email address of the user who sent the request. To do this, select the Email To field, click Add variable, and choose Email → Email From.
-
Write the text of your message. You can add issue fields to your message by clicking Add variable.
-
-
Save your trigger.
To see if the trigger works, send an email to the queue address.
Sending a notification when an issue is created based on a form
Let's say the support team is processing user requests in Tracker. Users contact the support team via a feedback form created in Yandex Forms. A Tracker issue is then created based on that form.
Let's set up a trigger that, once the issue is created, sends to the user an email that their request has been registered.
Step 1. Set up email integration
You need to set up email integration if you want to send emails from Tracker:
-
Set up an email address for the queue to store issues created based on user requests.
If you cannot add an address for the queue, it means that your organization does not have a domain. You need a domain to create mailboxes and newsletters, for example, to add an email address for your queue. You can add a domain in Yandex 360 for Business free of charge.
-
Set up sender names and signatures if needed.
-
If the users are not your company employees, allow sending emails from issue pages to external addresses.
Step 2. Set up a form to register requests
To create issues based on requests submitted from a form:
-
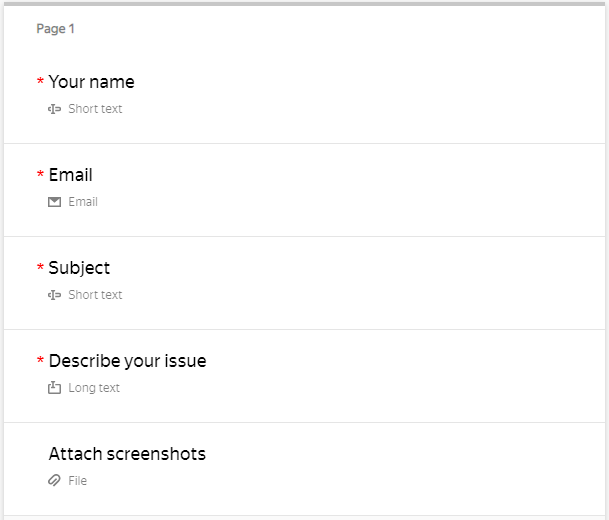
Go to Yandex Forms and create a new form.
-
Add questions that allow users to provide relevant information that is required to register their request.
If you want to know the user email address, add the Email question and make it a required field.
-
Set up integration withTracker for the form.
-
Specify the queue and other issue parameters.
-
Use the Issue description field to add answers to the questions included in your form.
-
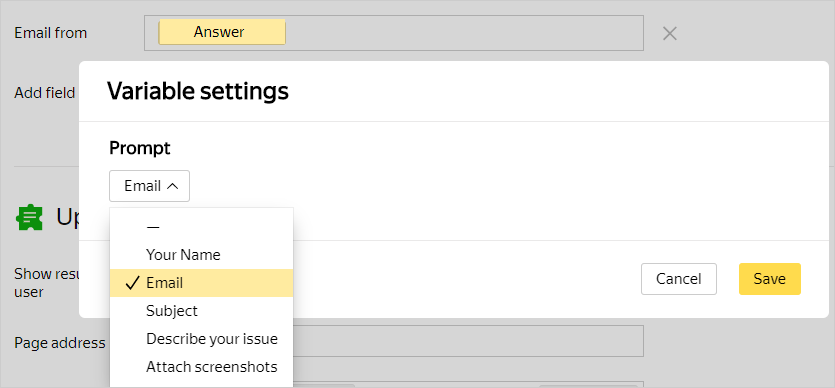
To save the user's email address in the issue settings, add the Email From field and select Variables → Answer to question → Email.
-
Save your integration settings.
-
-
Publish the form.
Step 3. Setting up a trigger for sending emails
Set up a trigger that, whenever an issue created from a form, will notify the user via email:
-
Go to the queue settings, open the Triggers section, and click Create trigger.
-
Enter a name for the trigger.
-
Set up the conditions to fire the trigger when an issue is created based on an incoming email:
-
Select Conditions to be met → All.
-
Add the condition: Event → Issue created.
-
Add the condition: Email → Email From → Field value set..
-
-
As a trigger action, set up sending an email:
-
Choose the Add comment action.
-
Enable Email.
-
In the Email To field, add the variable with the email address of the user who sent the request. To do this, select the Email To field, click Add variable, and choose Email → Email From.
-
Write the text of your message. You can add issue fields to your message by clicking Add variable.
-
-
Save your trigger.
To see if your trigger works, fill out the form you integrated with Tracker.
Automatically adding a form to the issue comments
You can choose a trigger to add a form with pre-populated fields to the issue comments. For this, add, as the comment text, a special code including a link to the form. Values can be passed to the form fields via GET parameters. For example, you can pass the issue's parameters using the variables available in the trigger.
Let's set up a trigger that, whenever an issue is closed, will add a feedback form to the comments and invite the assignee to comment.
Step 1. Creating a feedback form
-
Go to Yandex Forms and create a form.
-
Add questions so that users could provide the required information.
Step 2. Creating a trigger for adding a form
-
Go to the queue settings, open the Triggers section, and click Create trigger.
-
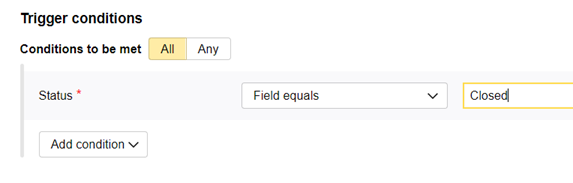
Set the conditions so that the trigger fires when the issue is closed:
-
Select Conditions to be met → All.
-
Add the condition: Status → became equal to → Closed.
-
-
Add the Add comment action.
-
Use the following code as the comment's text:
{{=<% %>=}}/iframe/(src="https://forms.yandex.ru/surveys/<form_ID>/?iframe=1&<question_ID>=<value>" frameborder=0 width=500)Where:
-
<form_ID>: ID of the form to add. -
<question_id>: Question ID. -
<value>: Value to use in the form field.To transfer issue parameters to the form, use variables as values: at the bottom of the window, click Add variable and choose the issue parameter. Then replace the
{{ }}characters around the name of the variable with<% %>.For example, to provide the issue key, use the
<%issue.key%>value. To provide the assignee login, use<%issue.assignee.login%>.
Here is an example of the code where the issue key is provided to a field of the form.
{{=<% %>=}}/iframe/(src="https://forms.yandex.ru/surveys/68***/?iframe=1&answer_short_text_584943=<%issue.key%>" frameborder=0 width=100% height=660px scrolling=no) -
-
Click
and enter Assignee in the Invite users from field line. -
Enable Send as robot.
-
Click Create to save the trigger.
Step 3. Add the yndx-forms-cnt-robot@ robot to the queue
To correctly insert the form, grant the yndx-forms-cnt-robot@ robot access to the queue. To learn more about setting up access, see Setting access rights for queues.
When the issue is closed, the robot will create a comment with a form and summon the assignee.
Automatically adding issues to your board
The new board version allows you to set up adding issues automatically by a filter or trigger.
Instead of a trigger, you can also set up an auto action with a similar condition and action. When using an auto action, the issues meeting the condition will be added to the board at the specified time intervals rather than immediately.
Warning
Triggers and auto actions only work for issues from the queue where they have been set up.
Here is an example of a trigger that will add an issue to the board when it is assigned to a certain user:
-
Go to the queue settings, open the Triggers section, and click Create trigger.
-
Enter a name for the trigger.
-
Set the condition: Assignee → became equal to →
<username>.Note
The trigger with this condition will also fire when an issue is created with the specified assignee.
-
Set up the action:
-
Select the action Update fields.
-
Select the Boards field.
-
Select the action: Add to list and specify the board where do you need to add an issue.

-
-
Save your trigger.
Sending notifications to instant messengers
By using messengers, you can quickly notify your employees about important events. If a messenger has an API, you can use Tracker to set up a trigger that sends HTTP requests to the messenger API when certain events occur. For example, this might be handy when a severe error occurs in your queue.
To view examples for setting up triggers that send notifications to Slack and Telegram, see Integration with messengers.
Automatically calculating the difference between dates
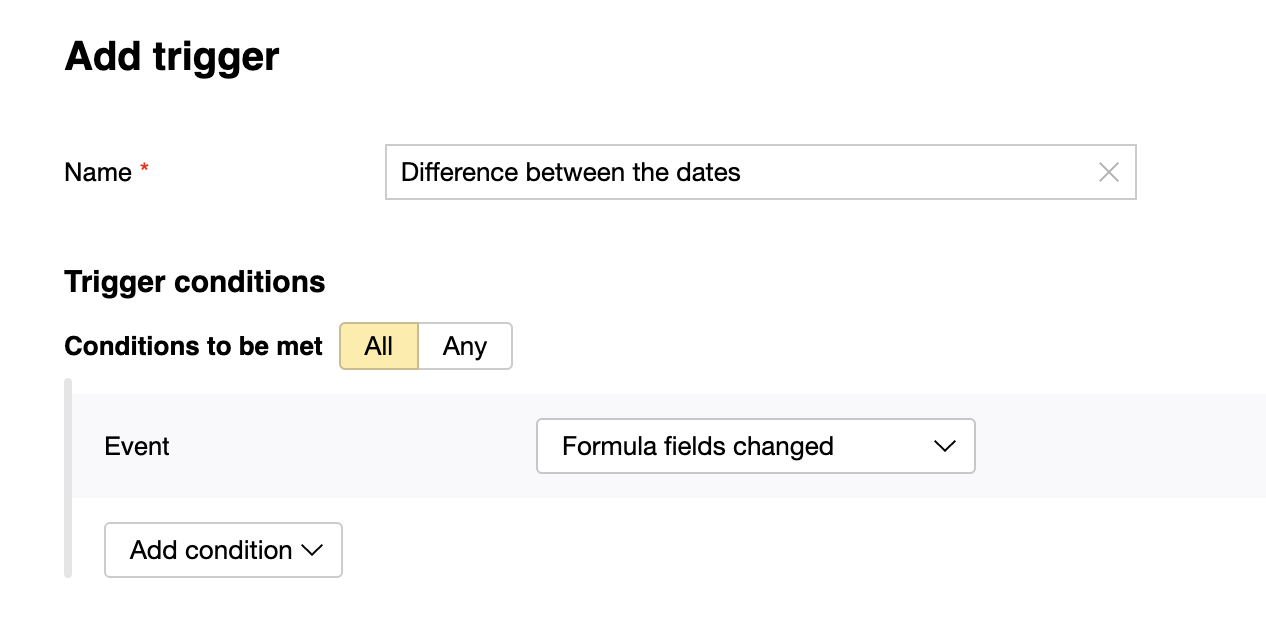
Let's set up a trigger to automatically calculate the difference between dates in Tracker:
-
Go to the queue settings, open the Triggers section, and click Create trigger.
-
Enter a name for the trigger.
-
Select Conditions to be met → All.
-
Add the condition: Event → Formula fields changed.
-
Set the actions for the trigger:
-
Add the value Calculate value.
-
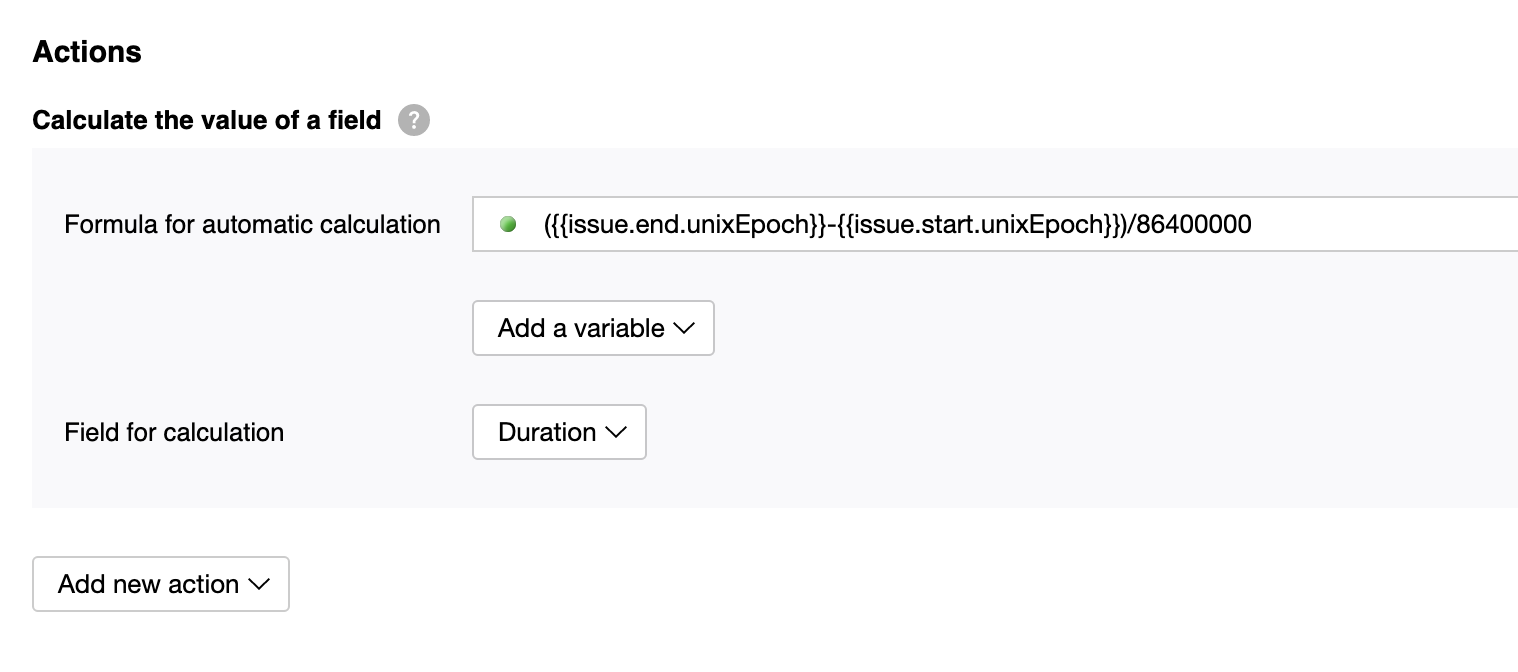
To get the difference of dates, in days, specify the following in the Formula to calculate the value field:
({{issue.end.unixEpoch}}-{{issue.start.unixEpoch}})/86400000 -
Select Calculated field from the list.
You can select one of the standard fields or create a new one, such as Duration:
-
-
Click Create to save the trigger.
To test the trigger, change the values in the Start Date and End Date fields.
Creating a sub-issue and writing field values from its parent issue to it
As an example, let's assume we need a trigger that creates a sub-issue and fills out its fields with values from the original issue. You can set up auto creation of issues like this using a trigger and Yandex Tracker API:
-
Go to the queue settings, open the Triggers section, and click Create trigger.
-
Select trigger conditions.
-
Select HTTP request as a target action.
-
Specify the request parameters. In the Request body field, set the parameters of a new sub-issue.
To substitute the values from the original issue, use variables:Field
Content
Method
POST
Address
https://api.tracker.yandex.net/v2/issuesAuthorization method
OAuth 2.0
Token
Authorization header
Authorization
Token type
OAuth
Content type
application/json
Request body
Example: Creating a sub-issue and transmitting to it field values from the original issue, such as description, assignee, followers, and tags.
{
   "summary": "<issue_name>",
   "queue": "<queue_key>",
   "description": {{issue.description.json}},
   "links": [
       {
           "relationship": "is subtask for",
           "issue": "{{issue.key}}"
       }
   ],
   "assignee": "{{issue.assignee.login}}",
   "tags": {{issue.tags.json}},
   "followers": {{issue.followers.uid.json}}
}
For more information about the request, see Creating an issue and Linking issues.
Headers
Header:
X-Org-IDorX-Cloud-Org-ID.
Value: Organization ID. If you only have a Yandex Cloud Organization organization, use theX-Cloud-Org-IDheader; if only Yandex 360 for Business or both organization types, useX-Org-ID. The ID is shown in the Organization ID for API field on the Tracker settings page.Note
Make sure the parameters you pass in the request body using variables are set in the original issue; otherwise, the trigger will not fire.
-
Click Create.
Updating status, priority and adding a comment in related issues
For example, we have a trigger that updates the status, priority, and adds a comment in related issues. Using a trigger and Yandex Tracker API, you can configure automatic update of related issues:
-
Go to the queue settings, open the Triggers section, and click Create trigger.
-
Select trigger conditions.
Warning
When creating a trigger condition, pay attention to the possibility of a cascading call in related issues.
-
Select HTTP request as a target action.
-
Specify the request parameters. In the Request body field, specify the update parameters in related issues. To substitute the values from the original issue, use variables:
Field
Content
Method
POST
Address
https://api.tracker.yandex.net/v2/bulkchange/_transitionAuthorization method
OAuth 2.0
Token
Authorization header
Authorization
Token type
OAuth
Content type
application/json
Request body
Example: Updating status, priority and adding a comment in related issues.
{
   "transition": "need_info",
   "issues": "Relates: {{issue.key}}",
   "values": {
       "comment": "<Comment for related issues>",
       "priority": {
           "key": "critical"
       }
   }
}
For more information about the request, see Bulk changes to issue statuses.
Headers
Header:
X-Org-IDorX-Cloud-Org-ID.
Value: Organization ID. If you only have a Yandex Cloud Organization organization, use theX-Cloud-Org-IDheader; if only Yandex 360 for Business or both organization types, useX-Org-ID. The ID is shown in the Organization ID for API field on the Tracker settings page.Note
If you need to change only field values in the related issues without changing the status, use the request: Bulk changes to issues.
Make sure the parameters you pass in the request body using variables are set in the original issue; otherwise, the trigger will not fire.
-
Click Create.